3. BMS1820 Battery Connection
BMS1820 measures up to 18 cells in series on the board and up to 14 slave modules over the isolated daisy chain. This page first shows the BMS1820 in a typical battery system, then how to wire the supply and the button, the cells, the temperature sensors, the current sensor, the slave modules, the outputs and inputs and the communication ports, and what to set in LiMon™ afterwards. The connector numbers are those of the pinout.
3.1 BMS1820 in a Battery System
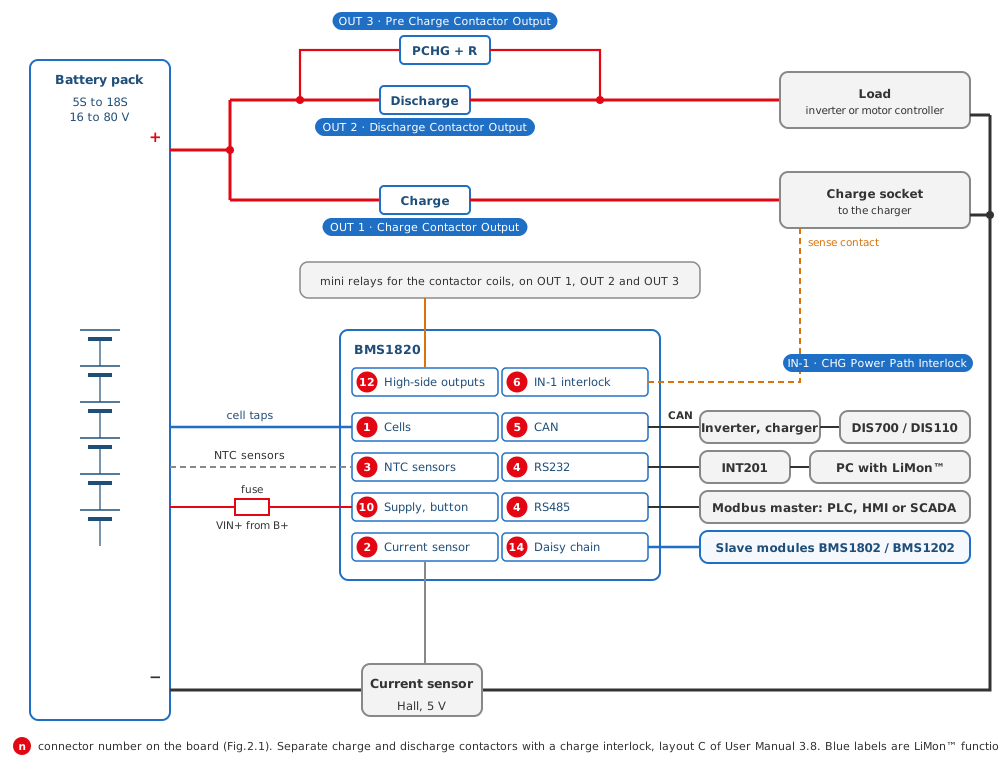
In a typical system the BMS1820 measures the cells and the temperatures of the pack and the pack current with a Hall sensor on the negative cable. It switches a separate discharge path to the load, with a precharge branch, and a charge path to the charge socket; three of its high-side outputs drive the coils of the charge, discharge and precharge contactors through mini relays. The sense contact of the charge socket goes to isolated input 1, set to CHG Power Path Interlock, so that the pack cannot discharge while the charge cable is plugged in. The BMS runs from the pack through a fuse, talks to the inverter, the charger and a DIS700 or DIS110 display over CAN, to a PC with LiMon™ over the service port and to a Modbus master over RS485. A pack with more than 18 cells adds slave modules on the daisy chain.
Fig.3.1.1: BMS1820 in a Typical Battery System
Tip
The figure uses layout C of User Manual 3.8 Power Path: separate charge and discharge contactors with a charge interlock. One main contactor for both paths is layout A there; the precharge itself is in User Manual 3.9 Precharge.
3.2 Power Supply and User Button
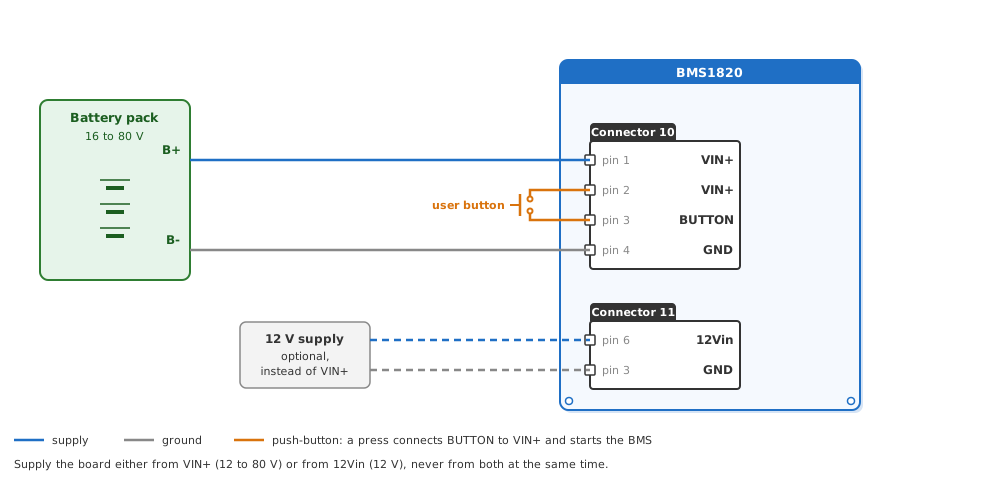
BMS1820 runs from 12 to 80 V on VIN+ of connector 10, normally straight from the pack, or from a 12 V supply on 12Vin of connector 11. Use one of the two, never both at the same time. The board starts with a press of the user button, a push-button between VIN+ (connector 10 pin 2) and BUTTON (pin 3); connector 11 pin 4 is the same button input for a button that sits elsewhere.
Fig.3.2.1: BMS1820 Supply and User Button
Tip
What the button does after the start, and how the BMS shuts itself down, is in User Manual 3.11 Button and Shutdown.
3.3 Cell Connection
Warning
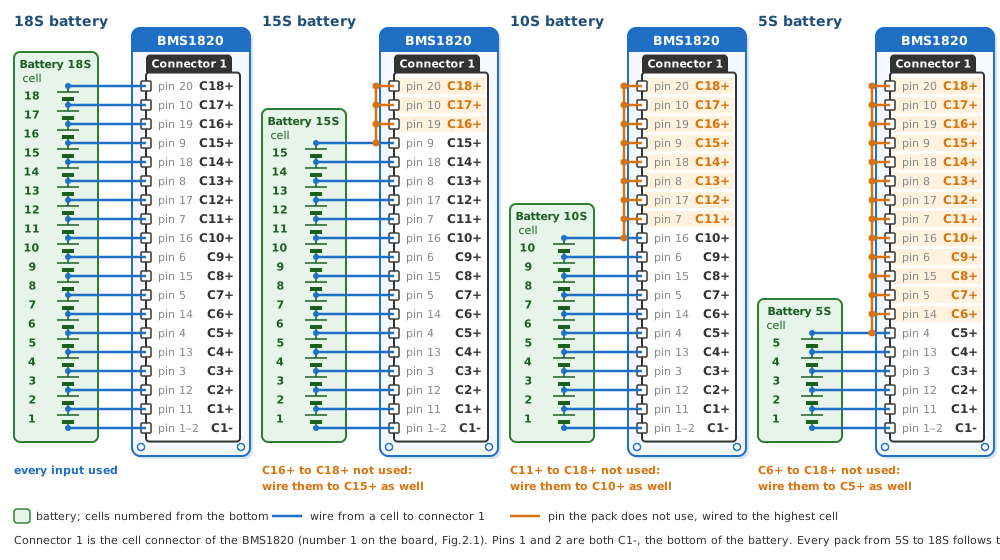
Take C1- and the tap of the top cell on wires of their own, not from the B- and B+ power cables of the pack. A wire shared with the load current drops voltage and gives wrong cell readings.
Info
Tie the unused inputs to the highest cell, on the cell measurement cable or at the connector; open inputs give wrong cell measurements.
Fig.3.3.1: BMS1820 5S to 18S Battery Cell Connections
Tip
After the wiring, check the cell count as 3.9 describes.
3.4 Temperature Sensor Connection
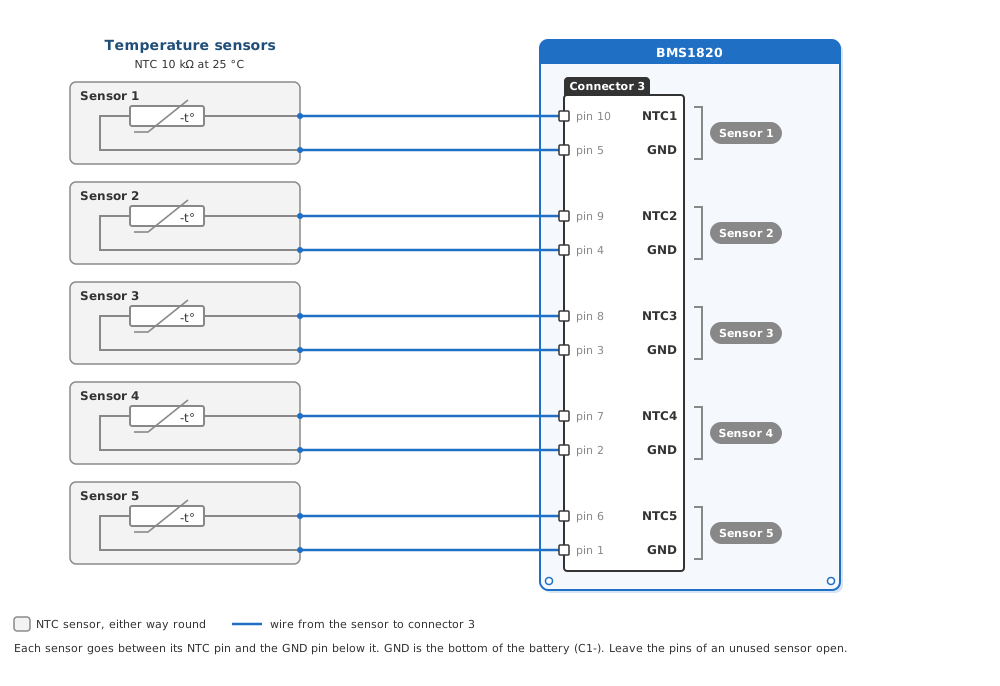
Up to five NTC sensors connect to connector 3, each between its NTC pin and the GND pin below it; in LiMon™ Live View they are T1 to T5.
Fig.3.4.1: BMS1820 Temperature Sensor Connection
Tip
Leave the pins of an unused sensor open: an input without a sensor is ignored. Check in Live View that every connected sensor reads a value.
3.5 Current Sensor Connection
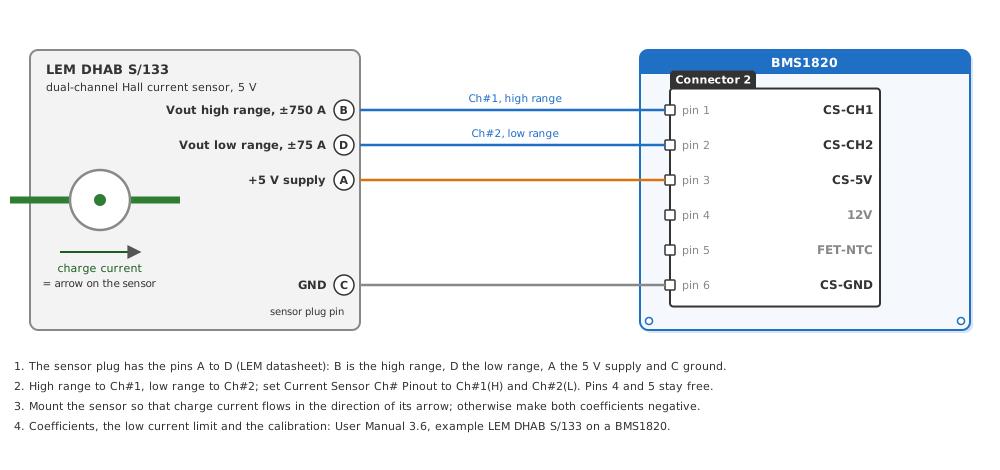
A Hall current sensor with a 5 V supply connects to connector 2: its output to CS-CH1 (pin 1), a second range of a dual-channel sensor to CS-CH2 (pin 2), its supply to CS-5V (pin 3) and CS-GND (pin 6). The figure shows a LEM DHAB S/133, a dual-channel sensor whose high range goes to Ch#1 and its low range to Ch#2. The sensor type, the channels and the coefficients are set in LiMon™; see User Manual 3.6 Current Measurement, which gives the values of this sensor on a BMS1820.
Fig.3.5.1: BMS1820 Current Sensor Connection, LEM DHAB S/133
3.6 Slave Modules via Isolated Daisy Chain Communication Port
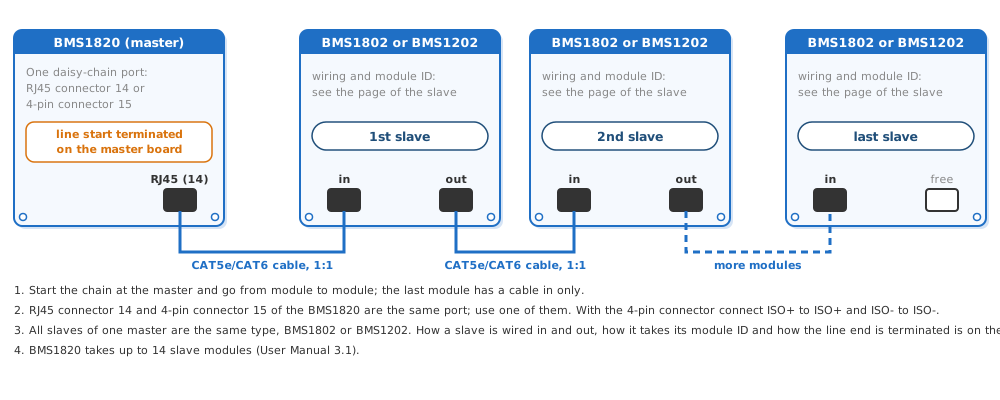
BMS1820 drives BMS1802 or BMS1202 slave modules over one isolated daisy-chain port, RJ45 connector 14 or 4-pin connector 15. The start of the line is terminated on the BMS1820 board.
Fig.3.6.1: BMS1820 Isolated Daisy Chain to the Slave Modules
Tip
Use CAT5e or CAT6 cable, up to 50 m. How each slave is wired in and out, how it takes its module ID and how the line end is closed is on its own page: BMS1802 Battery Connection or BMS1202 Battery Connection.
3.7 Outputs and Inputs
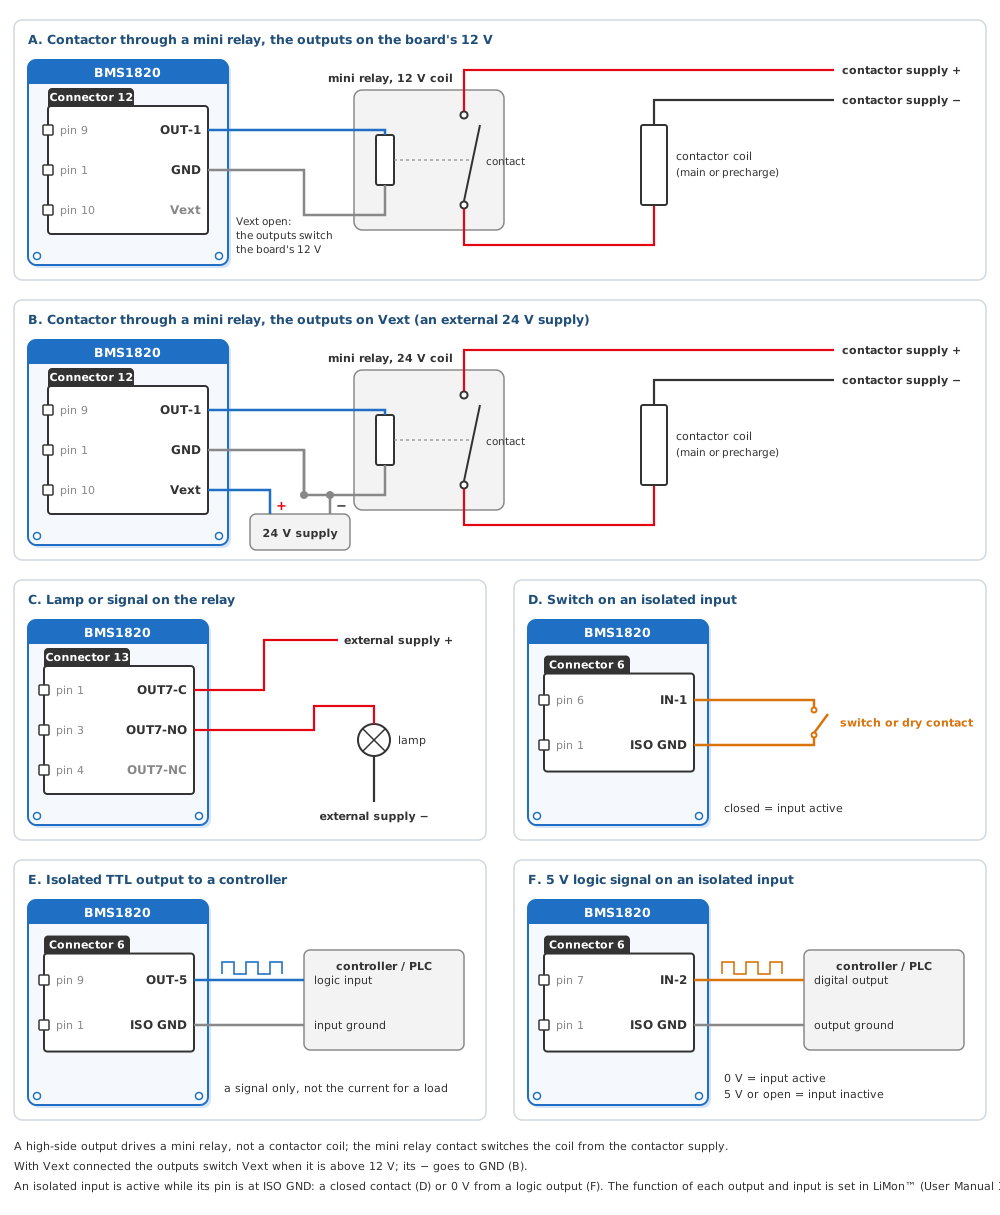
The four high-side switches on connector 12 drive mini relays and other small loads, not contactor coils: a contactor is switched by the contact of a mini relay, from its own supply. The outputs switch the 12 V of the board, or an external supply on Vext (pin 10) when it is above 12 V, for example 24 V for mini relays with a 24 V coil; the loads and the minus of the Vext supply return to GND on pins 1 to 5. The relay on connector 13 is a free contact (COM, N.O., N.C.). Connector 6 carries the isolated inputs and the isolated TTL outputs with their own ISO GND on pins 1 to 5: an input is active while it is at ISO GND, through a closed contact or a 0 V logic signal (5 V or open is inactive), and a TTL output gives a signal, not the current for a load. What each output and input does is set in LiMon™; see User Manual 3.10 Inputs and Outputs, whose Table.3.10.4 lists the pin of every LiMon™ number.
Fig.3.7.1: BMS1820 Output and Input Examples
Warning
Do not connect a contactor coil straight to a high-side output; use a mini relay. This manual gives no current rating for the outputs, so check any other load with LiBat™ first.
3.8 Communication Ports and Termination Switch
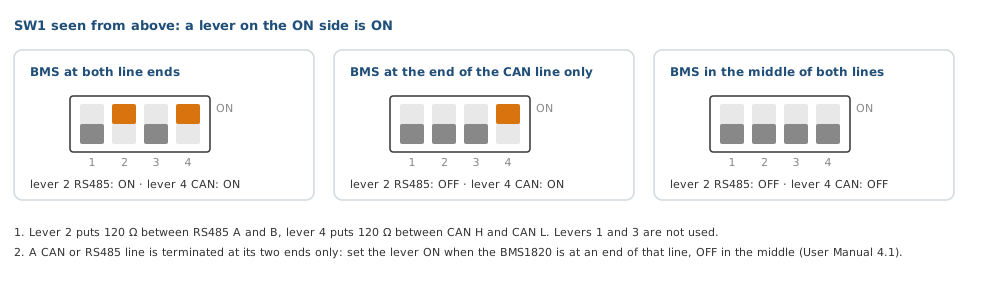
RS232 (the service port for LiMon™) and RS485 are on connector 4, CAN on connector 5, all isolated from the battery. CAN and RS485 are lines with a 120 Ω termination at each of their two ends. The termination switch SW1 has one lever for each line: lever 2 terminates RS485, lever 4 terminates CAN, levers 1 and 3 are not used. Set a lever ON only when the BMS1820 sits at an end of that line. The settings of the ports are in User Manual 4.1 Communication Ports.
Fig.3.8.1: BMS1820 Termination Switch SW1
3.9 Settings in LiMon™ and First Check
After the wiring, set the cells and the slave modules in LiMon™ and restart the BMS so that it finds them:
- Module ID#0: the cell count measured on connector 1 of the BMS1820 (5 to 18).
- Slave Module Type Selection: BMS1802 or BMS1202, or --- without slave modules. All slaves of one master are the same type.
- Module ID#n: the cell count of every slave module, from ID#1 up, up to 14 modules (User Manual 3.1 Battery Topology).
- Save, restart the BMS and check in Live View that every module is there with the cell count you set. The full procedure is in 2.1 Commissioning Checklist.
Table.3.9.1: Wiring Faults and What the BMS Reports
| Wiring fault | Event | What to check |
|---|---|---|
| A cell tap missing or loose, an unused input not tied to the highest cell, or a cell count in LiMon™ that does not match | (26) Cell Connection Error | Connected Cells of the module, then its cell connector and the cell count in LiMon™ |
| A daisy chain cable or connector broken, or a slave module below 11 V | (29) Slave Module Communication Error | Which module is missing in Live View, then its cables and its cell voltages |
| A temperature sensor not connected or its wire broken | none; the input is ignored | That the sensor reads a value in Live View |
After a fault is repaired, restart the BMS. All events and their causes are in 6.1 Events and What to Do.