3. DIS700 Connection
The DIS700 needs one cable to the BMS, on its 8-pin connector (3): two wires for CAN, and the supply, normally the VIN+ output of the BMS with GND. Where the BMS cannot supply it, a separate 12 V supply takes its place. The CAN of the DIS700 is isolated, so it needs no CAN ground.
First set-up in five steps
- Find your BMS in Fig.3.2.1 to Fig.3.2.5 and make the cable: CAN H, CAN L, GND and VIN+ out (3.2), or CAN H and CAN L with a separate 12 V supply (3.3).
- Put the 120 Ω termination at both ends of the CAN line: the switch or the resistor at the BMS, and 120 Ω in the cable connector of the DIS700 (3.4).
- In LiMon™, set the BMS to send the LiBat™ CAN protocol v2 by itself (3.5).
- With the BMS off, plug the cable into the BMS and into connector 3 of the DIS700.
- Start the BMS and press the on/off button (4): after the start screen of about 3 s the values fill in and the status LED turns green. If not, follow Fig.4.3.2.
3.1 Connector 3
Pins 1 and 7 carry CAN H and CAN L, pin 6 the supply from the BMS (18 V to 80 V), pin 5 a separate 12 V supply and pins 4 and 8 GND (Table.2.2). Pins 2 and 3 are N.C. (not connected, reserved): leave them open. The on/off button (4) sits in the supply from pin 6; a supply on pin 5 goes past it.
3.2 Wiring to a BMS
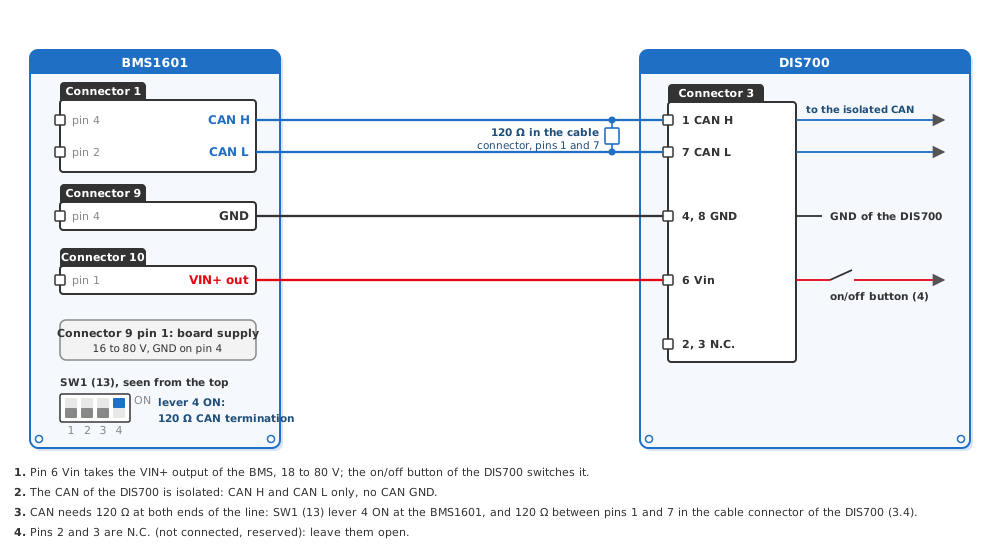
The figures below give the wiring for every LiBat™ master board: CAN H and CAN L from the CAN port of the BMS, GND and VIN+ out from the connectors that each figure names. VIN+ out carries the supply of the BMS, so the DIS700 starts with the BMS; it needs at least 18 V there. A BMS supplied with 12 V, for example on its 12 V input, cannot start the DIS700 on pin 6: use 3.3 instead.
Fig.3.2.1: DIS700 on a BMS1810
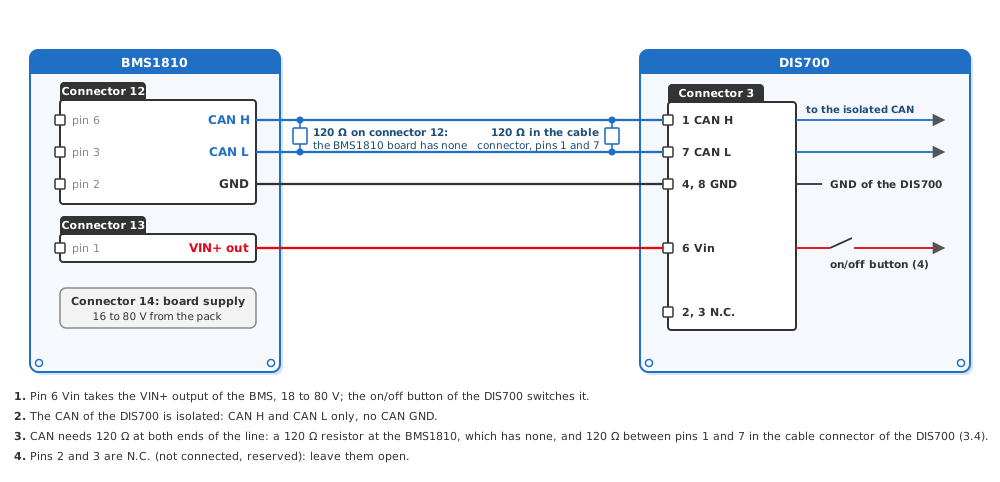
Fig.3.2.2: DIS700 on a BMS1820
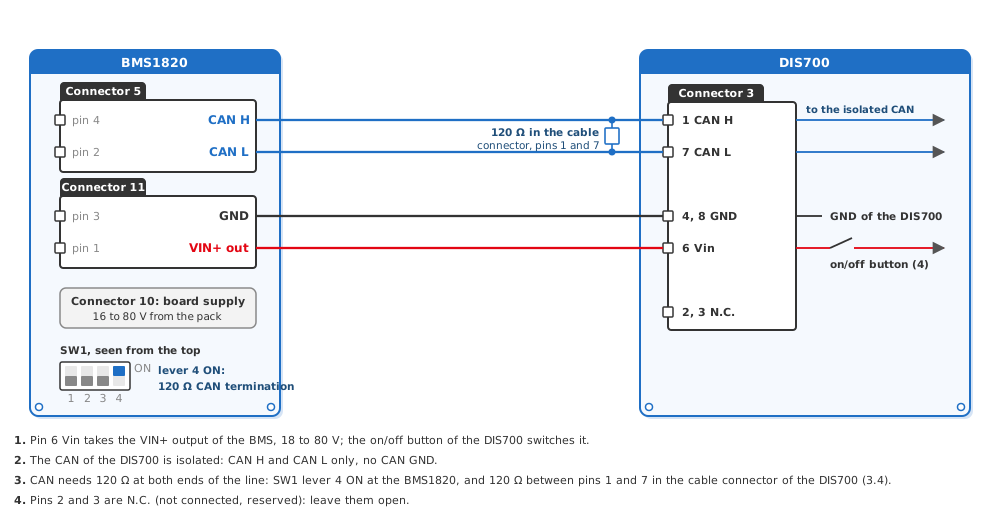
Fig.3.2.3: DIS700 on a BMS3610
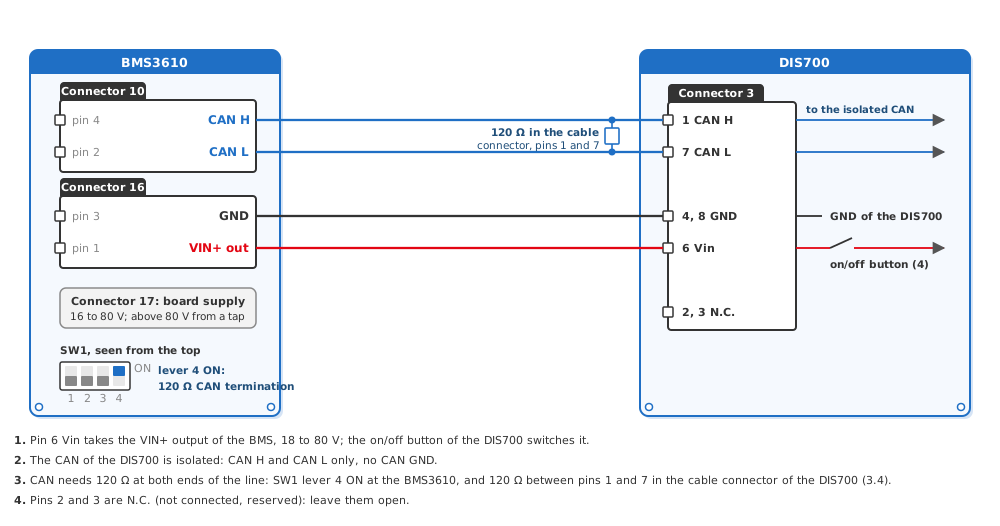
Fig.3.2.4: DIS700 on a BCU2002
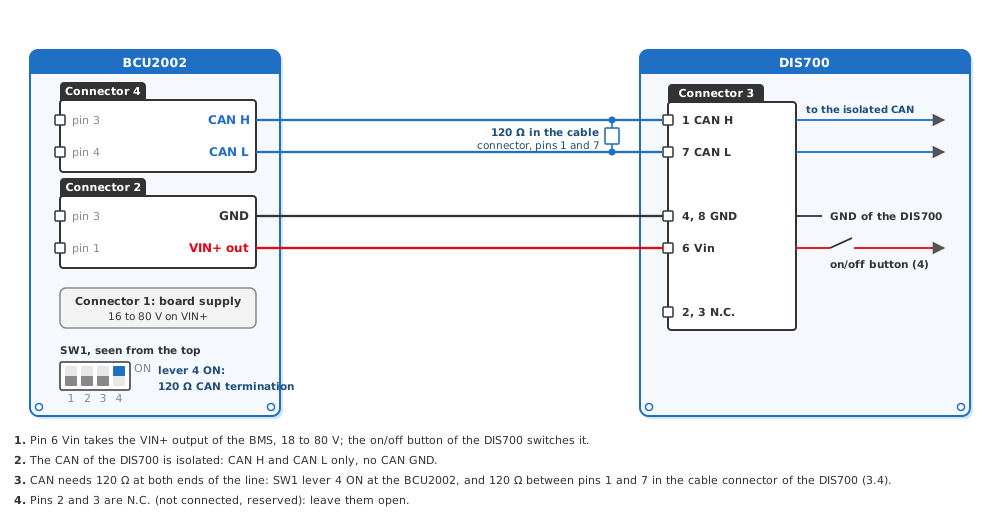
Fig.3.2.5: DIS700 on a BMS1601
3.3 Wiring with a Separate 12 V Supply
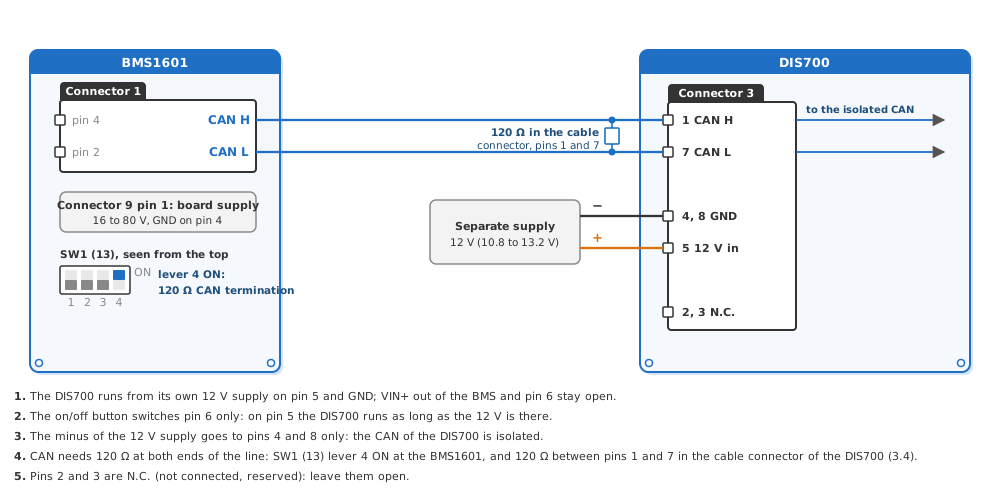
A DIS700 can also run from a separate, regulated 12 V supply, 10.8 V to 13.2 V, on pin 5 and GND. The 12 V system of a vehicle rises above 13.2 V while it charges: do not connect it to pin 5 directly. Then VIN+ out of the BMS and pin 6 stay open, and only CAN H and CAN L go to the BMS; the minus of the supply goes to pins 4 and 8 only, because the CAN of the DIS700 is isolated. The on/off button does not switch pin 5: the DIS700 runs as long as the 12 V is there.
Fig.3.3.1: DIS700 on a BMS1810 with a Separate 12 V Supply
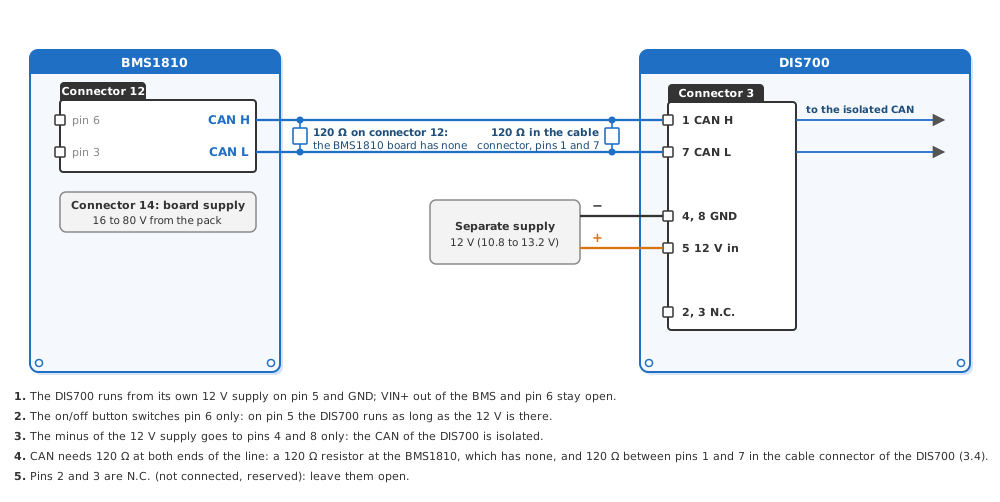
Fig.3.3.2: DIS700 on a BMS1820 with a Separate 12 V Supply
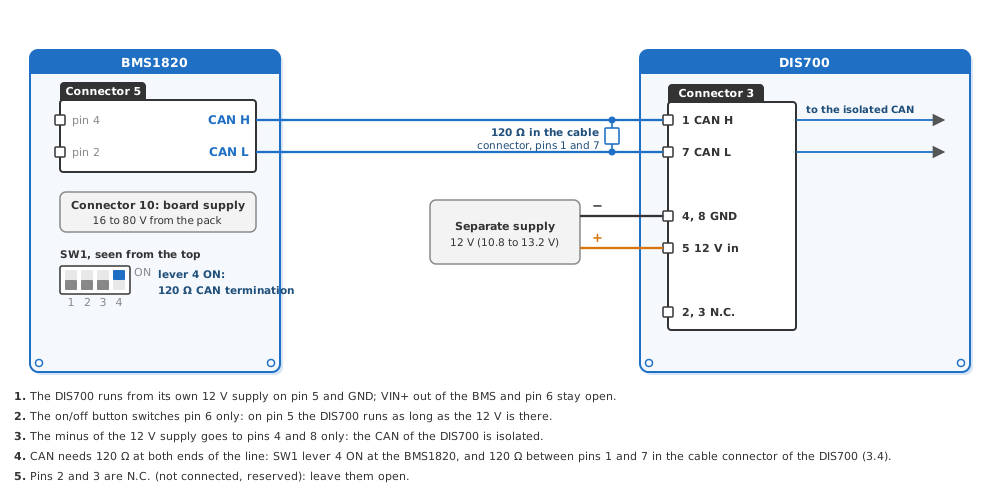
Fig.3.3.3: DIS700 on a BMS3610 with a Separate 12 V Supply
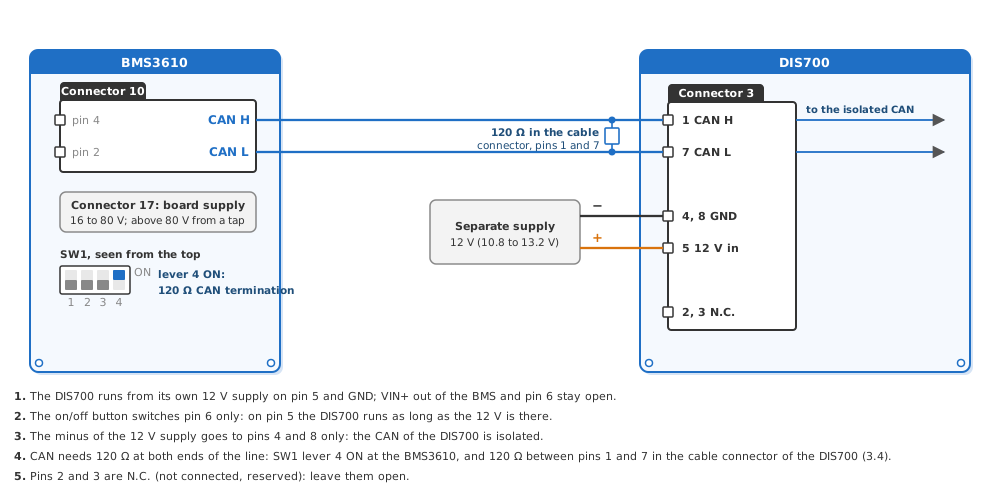
Fig.3.3.4: DIS700 on a BCU2002 with a Separate 12 V Supply
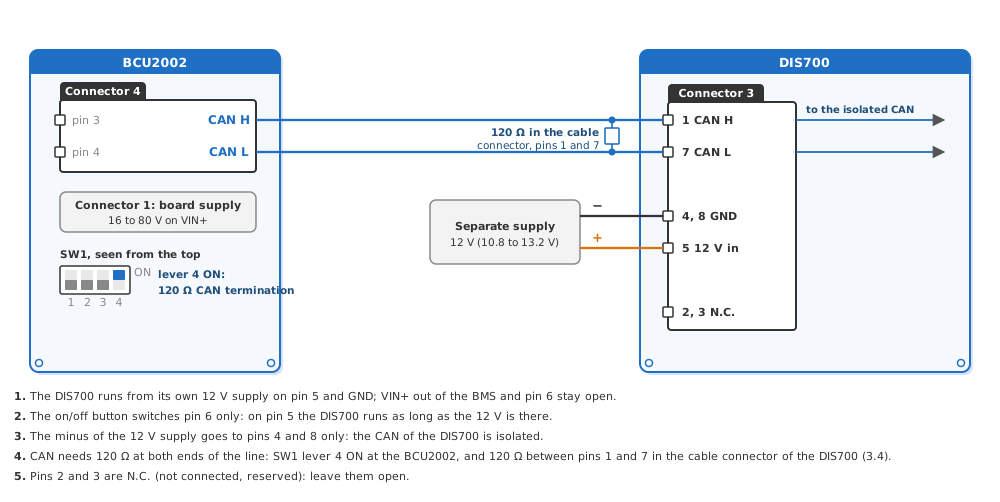
Fig.3.3.5: DIS700 on a BMS1601 with a Separate 12 V Supply
3.4 CAN Line and Termination
The DIS700 is one more device on the CAN line of the BMS. A CAN line has a 120 Ω termination at each of its two ends. At delivery the DIS700 has no termination switched on. In the usual layout the BMS sits at one end of the line and the DIS700 at the other: set the termination at the BMS, and put a 120 Ω resistor between pins 1 (CAN H) and 7 (CAN L) in the cable connector of the DIS700, as Fig.3.2.1 to Fig.3.3.5 show. Where the DIS700 sits between other devices on the line, it needs no resistor.
3.5 Settings in LiMon™
The DIS700 reads the frames of the LiBat™ CAN protocol v2. Set on the BMS, in LiMon™ Interface Settings: CANBus CH#1 Protocol to LiBat CANbus v2.0, and CANBus CH#1 Data Period to a period, so that the BMS sends its frames by itself. The DIS700 expects the default CANBus CH#1 Base Frame ID 0x0AAA and finds the bit rate by itself; a BMS with another base frame ID needs the matching CAN bus ID on the DIS700 (4.5). The settings are explained in User Manual 4.1 Communication Ports.
Danger
Check every connection and cable before you plug the cable connector into the DIS700 or a connector into the BMS.