4. DIS110 Operation
This page describes what the DIS110 shows while it runs and what its buttons do. The numbers are those of the pinout. The settings of the DIS110 itself (CAN, Wi-Fi, shutdown, login) are made in its web interface, and the LiBat Dashboard mobile app reads the battery over Bluetooth; both are described in the DIS110 user manual, available from LiBat™.
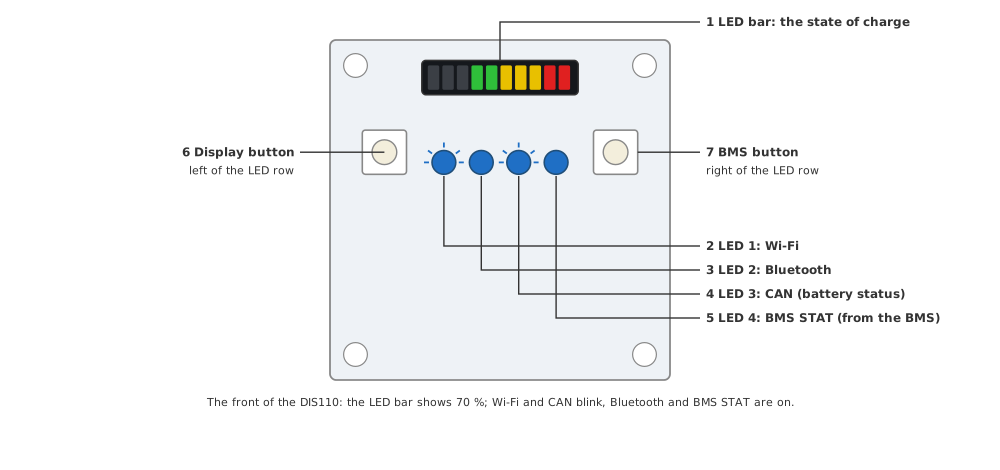
Fig.4.1: DIS110 Front
4.1 Power On and Off
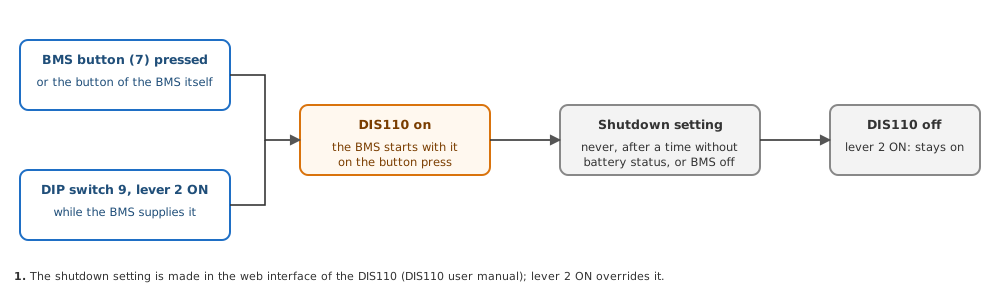
The DIS110 is supplied on connector 8, normally by the BMS. It turns on when its BMS button (7) or the button of the BMS is pressed, which starts the BMS at the same time, or always while lever 2 of the DIP switch (9) is ON. On a separate supply (3.3 Connection) its BMS button turns on the DIS110 only. When it turns itself off is set by its shutdown setting: never, after a time without battery status, or when the BMS stops sending. Lever 2 ON keeps it on while it has supply and overrides that setting; leave it OFF for normal use.
Fig.4.1.1: Power On and Off
4.2 Start-up
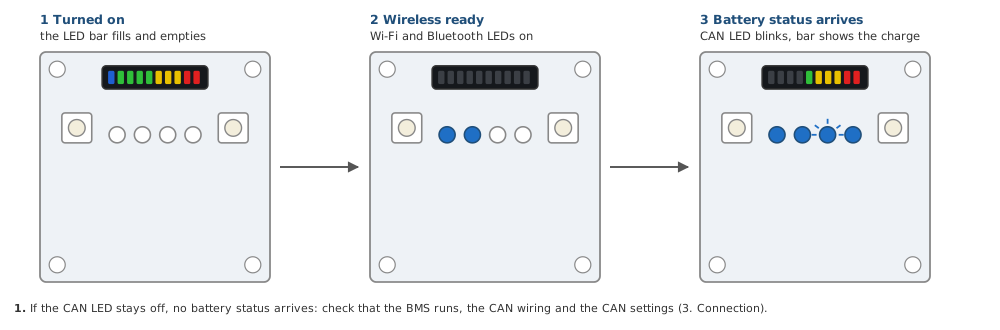
At power-on the LED bar plays a short animation, then the Wi-Fi and Bluetooth LEDs light up. When the battery status arrives from the BMS, the CAN LED blinks and the LED bar shows the state of charge. If the CAN LED stays off, the DIS110 gets no battery status: check that the BMS runs, the CAN wiring and the settings on the connection page.
Fig.4.2.1: Start-up
4.3 LED Bar
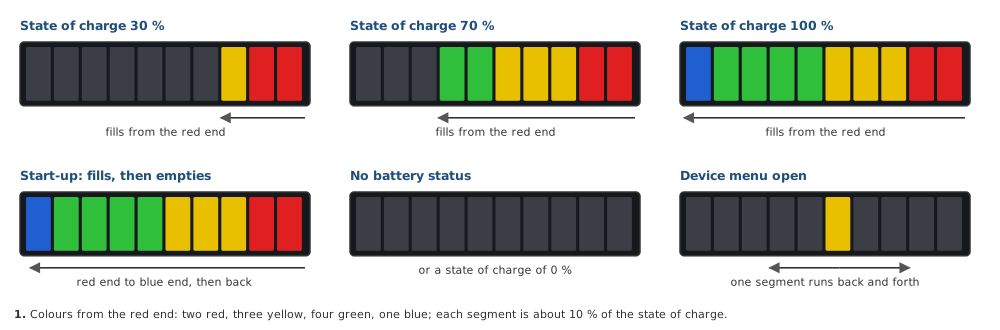
The LED bar (1) shows the state of charge that the BMS reports, about 10 % per segment, from red at the low end to blue at the full end. A few animations show the state of the DIS110 itself.
Table.4.1: LED Bar
| LED bar | Meaning |
|---|---|
| Segments for the state of charge | Normal use: about 10 % per segment |
| Fills and empties once | Start-up: the DIS110 has just turned on |
| All segments off | No current battery status, or a state of charge of 0 % |
| One segment runs back and forth | The device menu is open (4.6) |
Fig.4.3.1: LED Bar
4.4 Status LEDs
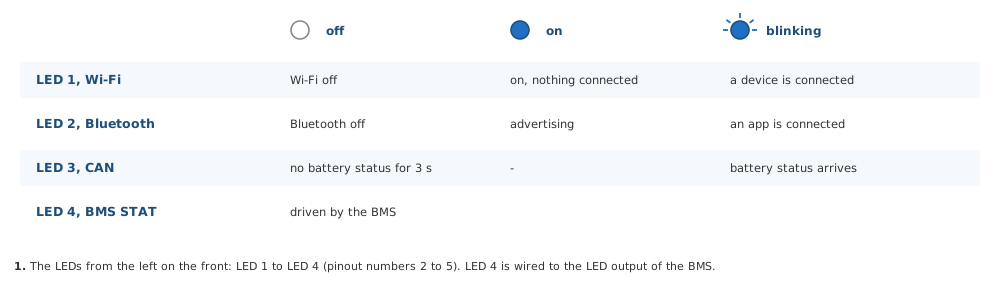
The four LEDs below the LED bar show how the DIS110 communicates. LED 4 is the status LED of the BMS: the BMS drives it through connector 8 like an LED on its own LED connector.
Table.4.2: Status LEDs
| LED | Off | On | Blinking |
|---|---|---|---|
| 2 LED 1, Wi-Fi | Wi-Fi off or timed out | Wi-Fi on, nothing connected | A phone or laptop is connected, or the DIS110 has joined a Wi-Fi network |
| 3 LED 2, Bluetooth | Bluetooth off | Advertising, nothing connected | At least one app is connected |
| 4 LED 3, CAN | No current battery status for more than 3 s | - | The battery status arrives |
| 5 LED 4, BMS STAT | Driven by the BMS |
Fig.4.4.1: Status LEDs
4.5 Buttons
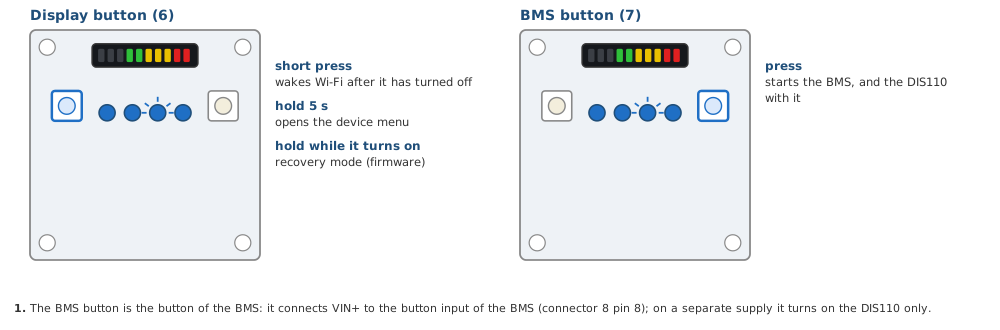
The Display button (6, left of the LED row) acts on the DIS110: a short press wakes Wi-Fi after it has turned off, and holding it for 5 s opens the device menu. Holding it while the DIS110 turns on starts the recovery mode instead, which reinstalls the firmware through the web interface (see the DIS110 user manual). The BMS button (7, right of the LED row) is the button of the BMS: it starts the BMS and with it the DIS110, as described for the button of each board in User Manual 3.11 Button and Shutdown. On a separate supply it turns on the DIS110 only.
Fig.4.5.1: Buttons
4.6 Device Menu
The device menu restarts the DIS110 or resets its settings without a phone or a laptop, for example when the login of the web interface is lost. Hold the Display button for 5 s: one segment of the LED bar runs back and forth, and LEDs 1 to 3 show the selected item. A short press moves to the next item, holding the button for 3 s runs it, and the selected LED blinks three times to confirm. Without a press for about 10 s the menu closes by itself.
Fig.4.6.1: Device Menu
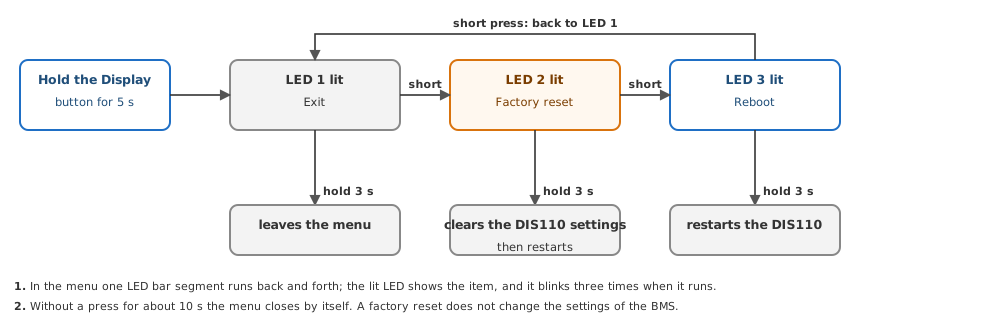
Table.4.3: Device Menu
| Lit LED | Menu item |
|---|---|
| LED 1 | Exit: leaves the menu |
| LED 2 | Factory reset: clears the settings of the DIS110, then restarts it |
| LED 3 | Reboot: restarts the DIS110 |
Warning
A factory reset also clears the Wi-Fi settings, the alias and the login of the web interface. It does not change the settings of the BMS.